Cane webbing is making a significant comeback in the world of interior design and furniture making. This natural material, known for its versatility, durability, and aesthetic appeal, has been a staple in furniture design for centuries. Whether you’re a professional furniture maker or a DIY enthusiast, adding cane webbing to furniture can elevate its look and bring a touch of timeless elegance to any space. In this article, we’ll explore the benefits of using cane webbing, how to incorporate it into your furniture, and some creative ideas to inspire your next project.

1. Why Choose Cane Webbing?
Cane webbing, made from the outer skin of the rattan plant, is not only eco-friendly but also incredibly durable. Its lightweight and flexible nature make it easy to work with, while its open weave pattern adds a unique texture and visual interest to furniture pieces.
- Aesthetic Appeal: Cane webbing has a natural, organic look that complements a wide range of interior styles, from rustic and bohemian to modern and minimalist. Its neutral color and intricate pattern add a warm, inviting touch to any room.
- Durability: Despite its delicate appearance, cane webbing is surprisingly strong and resilient. When properly maintained, it can last for many years, making it a practical choice for furniture that sees regular use.
- Breathability: The open weave of cane webbing allows air to circulate, making it an excellent choice for seating and other furniture pieces that benefit from ventilation. This feature not only adds comfort but also helps prevent moisture buildup.

2. Adding Cane Webbing to Furniture
Adding cane webbing to furniture can be done in several ways, depending on the piece you’re working with and the look you want to achieve. Here are some popular methods:
- Replacing Chair Backs and Seats: One of the most common uses of cane webbing is replacing the backs and seats of chairs. This is especially popular with mid-century modern and vintage chairs, where the cane webbing adds a classic touch. To do this, you can either use a pre-woven cane webbing sheet or hand-weave the cane strands yourself for a more personalized touch.
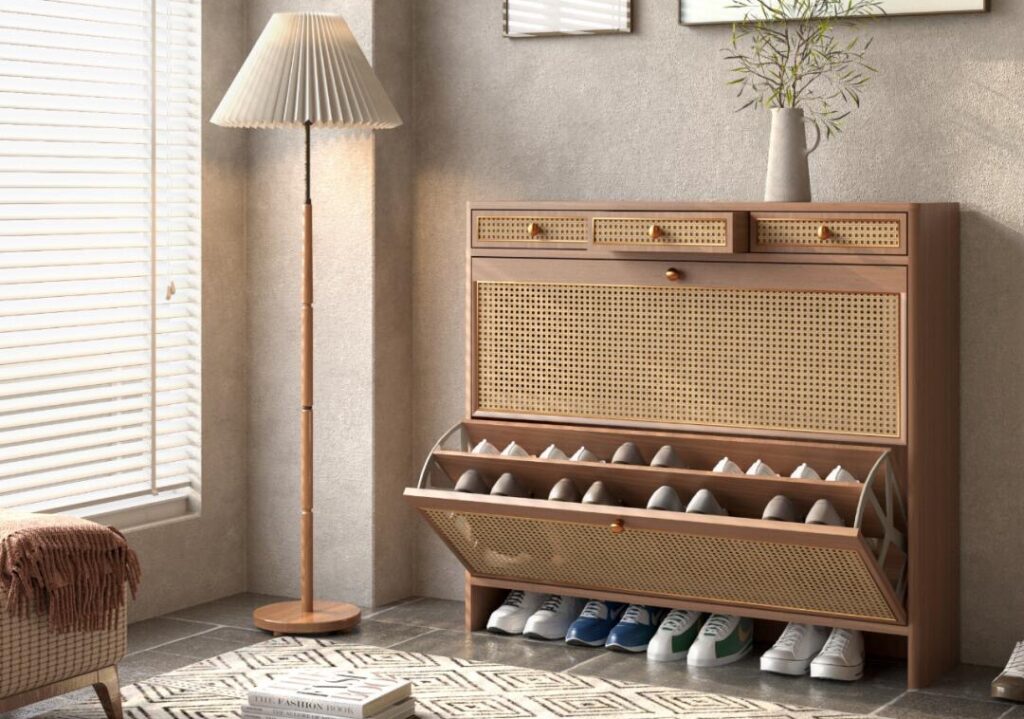
- Cabinet Doors: Cane webbing can also be used to replace solid panels in cabinet doors. This not only adds visual interest but also allows the contents of the cabinet to breathe. It’s a great way to update old cabinets or create a custom look for new ones.
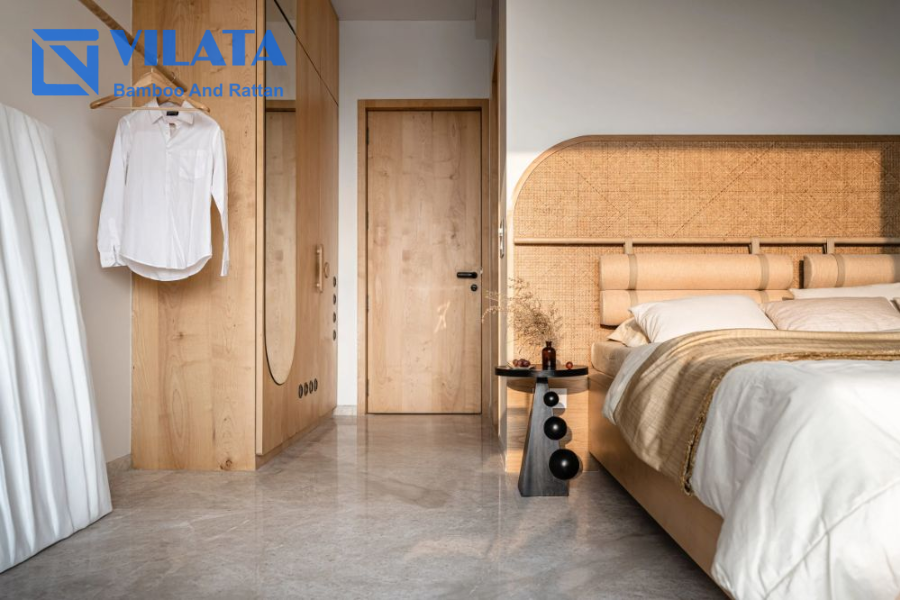
- Headboards: Adding cane webbing to a headboard can transform a simple bed frame into a statement piece. The natural texture and pattern of the cane add warmth and depth, making the bedroom feel cozy and inviting.
- Decorative Accents: For a more subtle approach, you can use cane webbing as an accent on furniture pieces like side tables, bookshelves, or even as wall art. These small touches can tie a room together and create a cohesive design theme.

3. Steps of Adding Cane Webbing to Furniture
If you’re ready to start adding cane webbing to your furniture, here’s a basic guide to help you get started:
- Gather Your Materials: You’ll need cane webbing (pre-woven or individual strands), a staple gun or tacks, a hammer, scissors, and a soaking tray if you’re using pre-woven cane.
- Prepare the Cane Webbing: If you’re using pre-woven cane webbing, soak it in warm water for about 30 minutes. This makes it more pliable and easier to work with.
- Remove the Old Material: Carefully remove the old seat, panel, or decorative piece from the furniture. Use this as a template to cut your new cane webbing to size.
- Attach the Cane Webbing: Place the wet cane webbing over the area where you want to attach it. Use a staple gun or tacks to secure the edges. Start from the center and work your way outwards to ensure an even and tight fit.
- Trim the Excess: Once the cane webbing is securely attached, trim any excess material with scissors. If needed, you can use a spline or decorative trim to cover the edges and give it a finished look.
- Let It Dry: Allow the cane webbing to dry completely. As it dries, it will tighten and form a firm, durable surface.
4. Creative Ideas for Using Cane Webbing

The possibilities for adding cane webbing to furniture are endless. Here are a few creative ideas to inspire your next project:
- Cane Webbing Room Divider: Create a stylish room divider by framing large panels of cane webbing. This adds texture and warmth to the space while maintaining an open and airy feel.
- Cane Webbing Light Fixtures: Use cane webbing to craft custom light fixtures, such as pendant lights or lampshades. The woven pattern allows light to filter through beautifully, creating a soft, ambient glow.
- Cane Webbing Planter Covers: Wrap cane webbing around plain plant pots or containers to create chic, natural-looking planter covers that blend seamlessly with your decor.
Conclusion
Adding cane webbing to furniture is a timeless trend that continues to captivate designers and homeowners alike. Its versatility, durability, and aesthetic appeal make it a valuable addition to any furniture piece. Whether you’re revamping an old chair, updating a cabinet, or creating something entirely new, cane webbing offers endless possibilities for creativity and style. By following the steps outlined above, you can easily incorporate this beautiful material into your furniture, bringing a touch of elegance and sophistication to your home.
Contact and follow us via:
- VILATA COMPANY LIMITED
- Adress: Office 02, Pearl Plaza Building, 561A Dien Bien Phu, Ward 25, Binh Thanh District, Ho Chi Minh City, Vietnam
- Website: rattanvn.com
- Email: rosie.vilata@gmail.com
- Phone: +84.394.090.698
- Facebook: (1) Facebook